Chapter 4: The Internet, World Wide Web, Web Browsers and Email
अध्याय 4: इंटरनेट, वर्ल्ड वाइड वेब, वेब ब्राउज़र एवं ईमेल
4.1 Basic Services of the Internet
The Internet is a vast, global network of interconnected computer networks that communicate using a common set of rules called protocols (chiefly TCP/IP), allowing any connected computer anywhere in the world to exchange data with any other. It is not owned by any single company or government; it is a cooperative network of networks.
इंटरनेट परस्पर जुड़े कंप्यूटर नेटवर्कों का एक विशाल वैश्विक जाल है, जो सामान्य प्रोटोकॉल (मुख्यतः TCP/IP) के माध्यम से आपस में डेटा का आदान-प्रदान करता है। यह किसी एक कंपनी या सरकार के स्वामित्व में नहीं है।
Basic services commonly provided over the Internet include:
-
World Wide Web (WWW) — browsing linked pages of text, images, audio and video using a web browser.
-
Electronic Mail (Email) — sending and receiving digital letters instantly, covered in detail later in this chapter.
-
File Transfer (FTP/downloads) — uploading or downloading files between a computer and a remote server.
-
Instant Messaging and Video Calling — real-time text, voice, and video communication (e.g., WhatsApp, Google Meet, Zoom).
-
Social Networking — platforms for sharing updates, photos and connecting with other people (e.g., Facebook, Instagram, LinkedIn).
-
E-commerce and Online Banking — buying/selling goods and transferring money securely over the Internet.
-
Cloud Storage — storing files remotely so they can be accessed from any device (e.g., Google Drive, OneDrive).
4.2 The World Wide Web (WWW) and How It Works
The World Wide Web (WWW), or simply 'the Web', is a service that runs ON the Internet — it is a huge collection of documents (web pages) linked together by hyperlinks, and accessed using web browsers. People often use 'Internet' and 'Web' interchangeably, but the Web is only one of many services the Internet carries; email and instant messaging, for example, also travel over the Internet but are not part of the Web.
-
Web Page — a single document written mainly in HTML (HyperText Markup Language), viewable in a browser.
-
Website — a collection of related web pages grouped under one domain name, e.g., www.example.com.
-
Web Server — a powerful computer that permanently stores a website's files and 'serves' (sends) them to browsers on request.
-
Hyperlink (Link) — clickable text or image that jumps to another web page or a different part of the same page; the underlying mechanism that makes the Web a 'web' of interconnected pages.
-
HTTP / HTTPS (HyperText Transfer Protocol / Secure) — the rules that govern how a browser requests a page and how a server responds; the 'S' in HTTPS means the connection is encrypted and therefore safer.
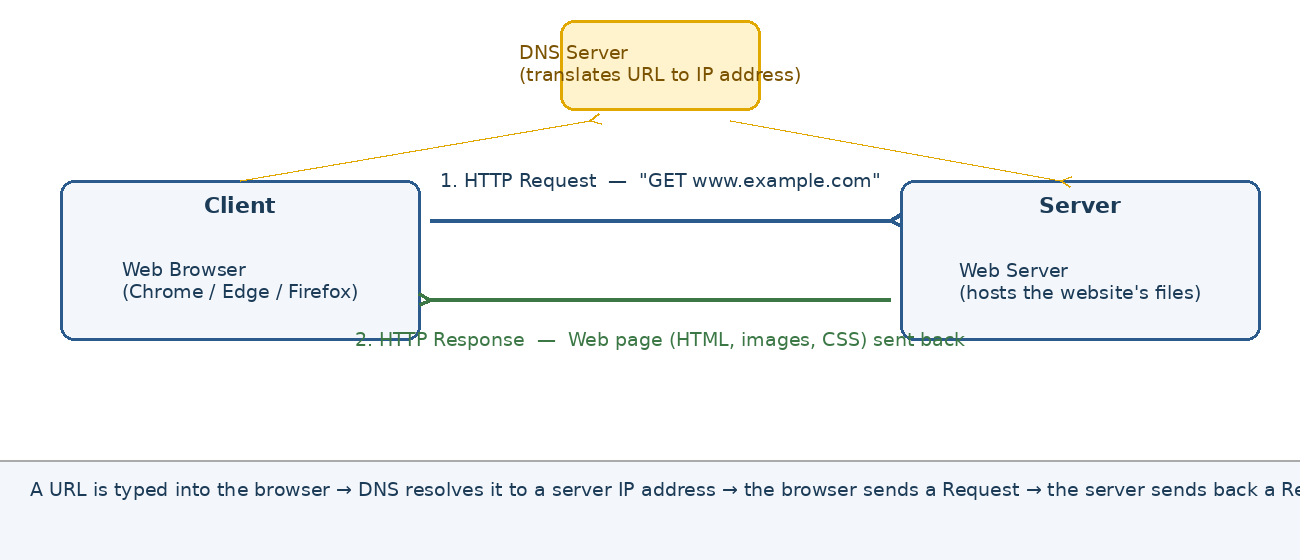
Fig 4.1 — How a browser fetches a web page (client-server request/response, with DNS translating the URL to a server address)
Step-by-step, what happens when a URL is typed into the address bar and Enter is pressed:
-
The browser sends the typed address to a DNS (Domain Name System) server, which works like a phone directory, translating the human-readable name (e.g., www.example.com) into the server's numeric IP address.
-
The browser sends an HTTP/HTTPS Request to the web server at that IP address, asking for the specific page.
-
The web server locates the requested files and sends back an HTTP Response containing the page's HTML, images, and other resources.
-
The browser receives this response and renders (draws) it on screen as the familiar web page.
जब पता बार में कोई URL टाइप किया जाता है, तो DNS सर्वर उसे संख्यात्मक IP पते में बदलता है, ब्राउज़र सर्वर को अनुरोध (request) भेजता है, और सर्वर वेब पृष्ठ को उत्तर (response) के रूप में वापस भेजता है, जिसे ब्राउज़र स्क्रीन पर प्रदर्शित करता है।
4.3 Basic Internet Terminology
| Term | Meaning |
|---|---|
| ISP (Internet Service Provider) | A company (e.g., Jio, Airtel, BSNL) that provides a paid connection linking a home/office computer to the wider Internet. |
| IP Address | A unique numeric address (e.g., 192.168.1.1) assigned to every device on a network, used to identify and locate it, similar to a postal address. |
| URL (Uniform Resource Locator) | The complete web address typed into a browser, e.g., https://www.example.com/page.html, specifying the protocol, domain, and exact page. |
| Domain Name | The easy-to-remember name part of a URL (e.g., example.com) that DNS translates into an IP address. |
| Web Browser | Software used to access, display, and navigate web pages (covered in Section 4.4). |
| Search Engine | A website (e.g., Google, Bing) that indexes the Web and returns a ranked list of pages matching a typed query. |
| Bandwidth | The maximum amount of data that can travel through an Internet connection per second, commonly measured in Mbps (megabits per second). |
| Wi-Fi | A technology that lets devices connect to a network wirelessly using radio waves, typically over a short range such as a home or office. |
4.4 Types of Internet Connections
-
Dial-Up — an old, slow method using a telephone line and a modem; now largely obsolete.
-
Broadband (DSL/Cable) — a faster, always-on wired connection delivered over telephone or cable-TV lines.
-
Fibre-Optic (FTTH) — very high-speed connection using glass/plastic fibre cables that carry data as pulses of light; the fastest common household option today.
-
Mobile Data (3G/4G/5G) — wireless Internet access through a mobile network operator's SIM card, used on smartphones and portable hotspots.
-
Wi-Fi — not an Internet connection by itself, but a wireless method of sharing an existing broadband/fibre connection among nearby devices.
-
Satellite Internet — beamed from an orbiting satellite; useful in remote areas lacking cable/fibre infrastructure, but usually slower and costlier.
✎ Exercise 4.4 (Practice / अभ्यास)
- List the type(s) of Internet connection available at your home and college. In one line each, note their approximate speed and whether they are wired or wireless.
4.5 Web Browsers: Meaning and Popular Browsers
A Web Browser is application software used to locate, retrieve, and display content (web pages) from the World Wide Web, and to let the user navigate from one page to another via hyperlinks.
-
Google Chrome — the most widely used browser worldwide, known for speed and a large library of extensions.
-
Microsoft Edge — built into Windows, based on the same engine as Chrome, with integrated tools for reading and note-taking.
-
Mozilla Firefox — an open-source browser known for strong privacy controls.
-
Apple Safari — the default browser on Apple devices (Mac, iPhone, iPad), optimised for that ecosystem.
-
Opera — includes a free built-in VPN and ad-blocker as standard features.
वेब ब्राउज़र एक एप्लीकेशन सॉफ्टवेयर है, जिसकी सहायता से वर्ल्ड वाइड वेब से सामग्री प्राप्त की जाती है और हाइपरलिंक के माध्यम से एक पृष्ठ से दूसरे पृष्ठ पर जाया जाता है। Chrome, Edge, Firefox तथा Safari प्रमुख ब्राउज़र हैं।
4.6 The Browser Interface and Navigation
Although browsers differ in appearance, nearly all share the same core interface elements:
-
Address Bar (Omnibox) — where a URL or search term is typed; also shows the padlock icon confirming a secure (HTTPS) connection.
-
Tabs — allow several web pages to be open simultaneously within one browser window; Ctrl+T opens a new tab, Ctrl+W closes the current one.
-
Back / Forward buttons — move to the previously/subsequently viewed page in the current tab's history.
-
Refresh (Reload) button — reloads the current page from the server, useful if a page fails to load fully or content has changed (e.g., live scores).
-
Home button — takes the browser to a pre-set starting page.
-
Bookmarks/Favourites (Ctrl+D to add) — saves the address of a page for quick access later without retyping the URL.
-
History (Ctrl+H) — a chronological list of every page visited, letting a user revisit or clear past browsing activity.
-
Downloads (Ctrl+J) — shows files that have been downloaded from the Web to the computer.
✎ Exercise 4.6 (Practice / अभ्यास)
- Open your browser, add your college website (or any three educational websites) to Bookmarks, then open the History list and note down the last three pages you visited.
4.7 Searching the Web Effectively
A search engine such as Google accepts a typed query and returns a ranked list of matching web pages. A few techniques make searches far more precise:
-
Use specific keywords rather than full sentences, e.g., "VOI001 syllabus MS Access" rather than "what is in my course".
-
Enclose an exact phrase in quotation marks, e.g., "world wide web" to find that precise wording only.
-
Use a minus sign to exclude a word, e.g., jaguar -car to find the animal rather than the vehicle brand.
-
Restrict results to one website using site:, e.g., site:invertis.org admission.
-
Use the Images, Videos, News, and Maps tabs of the search engine to filter results by content type.
खोज इंजन में सटीक कीवर्ड, उद्धरण चिह्नों में वाक्यांश, माइनस चिन्ह से बहिष्करण, तथा site: जैसे विशेष कमांड का उपयोग करने से अधिक सटीक और उपयोगी परिणाम प्राप्त होते हैं।
4.8 Safe Use of the Internet — Common Threats
Being aware of common online threats is the first step toward safe browsing:
-
Phishing — fraudulent emails or websites disguised as genuine (e.g., a fake bank login page) designed to steal passwords or card details; never enter sensitive details after clicking a link from an unexpected email.
-
Malware and Viruses — harmful software that can damage files or steal data, often bundled with pirated software or unsafe downloads.
-
Fake/Insecure Websites — sites without HTTPS (no padlock icon) may transmit data (including passwords) without encryption.
-
Cyberbullying and Online Harassment — abusive or threatening behaviour directed at someone through social media, chat or email.
-
Oversharing Personal Information — publicly posting details like home address, phone number, or daily schedule can enable stalking or identity theft.
-
Fake News and Misinformation — unverified or deliberately false content that spreads quickly on social media.
फ़िशिंग, मैलवेयर, असुरक्षित वेबसाइट, साइबर-बुलिंग तथा व्यक्तिगत जानकारी का अत्यधिक साझाकरण इंटरनेट के सामान्य खतरे हैं, जिनके प्रति सजग रहना आवश्यक है।
4.9 Safe Use of the Internet — Good Practices
-
Check for HTTPS and the padlock icon before entering any password, card number, or personal detail on a website.
-
Use a strong, unique password for each important account, ideally combined with Two-Factor Authentication (2FA) for an extra security code.
-
Never click links or open attachments from unknown or suspicious senders; hover over a link first to preview its real destination.
-
Keep the operating system, browser, and antivirus software updated, since updates frequently patch known security holes.
-
Review privacy settings on social media to control who can see personal posts, photos, and location.
-
Verify a story on at least one other reliable source before sharing news or forwarding messages.
-
Log out of accounts and clear browsing data when using a shared or public computer.
✎ Exercise 4.9 (Practice / अभ्यास)
- Open your browser's Settings and check whether it is set to auto-update. Then examine the privacy settings of one social media account you use and list two changes you would make to protect your personal information.
4.10 Creating an Email Account
Email (electronic mail) lets a user send digital letters, along with file attachments, almost instantly to anyone with an email address, anywhere in the world. Before sending or receiving email, a free email account must be created with a provider such as Gmail, Outlook.com, or Yahoo Mail.
Step-by-step: creating a free Gmail account
-
Open a web browser and go to accounts.google.com (or tap Create account within the Gmail app).
-
Click Create account and choose For myself.
-
Enter your First name and Last name.
-
Choose a Username — this becomes the part before '@gmail.com' in your address (e.g., aarav.sharma2026@gmail.com); if it is already taken, Google will suggest alternatives.
-
Create a strong Password (a mix of upper/lower-case letters, numbers, and symbols) and confirm it.
-
Provide a recovery phone number and/or recovery email address — essential for resetting a forgotten password later.
-
Enter your date of birth and gender, then agree to Google's Privacy Policy and Terms of Service.
-
Click Next; the account is created and the Gmail Inbox opens automatically.
जीमेल खाता बनाने हेतु accounts.google.com पर जाकर 'Create account' चुनें, नाम, उपयोगकर्ता-नाम (username) एवं सशक्त पासवर्ड दर्ज करें, रिकवरी नंबर/ईमेल दें, तथा शर्तों से सहमत होकर खाता पूर्ण करें।
4.11 The Email Interface
-
Inbox — where all newly received emails first appear.
-
Compose — the button that opens a new blank email window to write and send a fresh message.
-
Sent — a folder holding a copy of every email you have sent.
-
Drafts — automatically stores an unfinished email so it is not lost if you close it before sending.
-
Spam/Junk — a folder where the email service automatically routes messages it suspects are unwanted or fraudulent.
-
Trash/Bin — holds deleted emails temporarily (usually 30 days) before permanent removal.
-
Starred/Important — lets a user flag specific emails to find them quickly later.
4.12 Composing and Sending an Email
The basic fields of an email, filled in while composing:
| Field | Purpose |
|---|---|
| To | The email address(es) of the main recipient(s). |
| CC (Carbon Copy) | Additional recipients who should be aware of the email; their addresses are visible to everyone. |
| BCC (Blind Carbon Copy) | Additional recipients who receive a copy WITHOUT their address being visible to other recipients. |
| Subject | A short, clear one-line summary of the email's content — never leave this blank. |
| Body | The main message text, which can include formatting (bold, bullet lists, links) in most webmail composers. |
| Attachment (paperclip icon) | Used to attach a file; covered in detail in Section 4.14. |
-
Click Compose to open a new message window.
-
Type the recipient's email address in the To field (and CC/BCC if needed).
-
Type a clear Subject line.
-
Type the message in the body area, add any attachment (Section 4.14).
-
Proofread the message, then click Send.
ईमेल भेजने हेतु 'Compose' पर क्लिक करें, प्राप्तकर्ता का पता 'To' में लिखें, स्पष्ट 'Subject' दें, संदेश टाइप करें, आवश्यक होने पर अटैचमेंट जोड़ें, तथा अंत में 'Send' पर क्लिक करें।
4.13 Receiving, Replying to and Forwarding Emails
-
Receiving — new mail arrives automatically in the Inbox; unread messages are usually shown in bold.
-
Reply — sends a response back to only the original sender, automatically quoting the original message below.
-
Reply All — sends the response to the original sender AND every other recipient who was on the To/CC list — use with care to avoid unnecessary mass replies.
-
Forward — sends a copy of a received email (with its original content) on to a new, different recipient, optionally with an added note.
-
Marking as Read/Unread — lets a user manually flag a message to revisit later, or clear the 'unread' bold indicator.
✎ Exercise 4.13 (Practice / अभ्यास)
- Exchange a test email with a classmate: send them a short email with the subject 'Test Mail — Roll No.', ask them to Reply, and then Forward their reply to your teacher's email address.
4.14 Sending and Receiving Emails with Attachments
An Attachment is a file (document, image, spreadsheet, PDF, etc.) sent along with an email rather than typed into its body.
Step-by-step: attaching and sending a file
-
While composing an email, click the paperclip (Attach files) icon in the compose window's toolbar.
-
Browse to and select the file(s) on your computer (or choose 'Insert from Drive' for a cloud file); multiple files can usually be selected together.
-
Wait for the upload progress bar beneath the Subject line to complete before clicking Send — sending before the upload finishes can result in a failed or missing attachment.
-
Click Send; the recipient will see the attachment as a small icon/thumbnail near the bottom of the email.
Step-by-step: downloading a received attachment
-
Open the received email containing the attachment.
-
Hover over the attachment thumbnail; a Download icon appears — click it to save the file to the computer's Downloads folder.
-
Scan downloaded attachments with antivirus software before opening them, especially from unfamiliar senders (Section 4.8).
-
Most webmail providers (e.g., Gmail) limit individual attachments to around 25 MB; larger files must instead be shared as a cloud-storage link (e.g., Google Drive).
-
Compressing a group of files into a single .zip folder before attaching keeps the email tidy and can reduce the total upload size.
अटैचमेंट भेजने हेतु कंपोज़ विंडो में पेपरक्लिप आइकन पर क्लिक कर फ़ाइल चुनें, अपलोड पूर्ण होने की प्रतीक्षा करें, फिर 'Send' दबाएँ। प्राप्त अटैचमेंट को डाउनलोड करने से पहले एंटीवायरस से जाँच लेना सुरक्षित रहता है।
4.15 Organising Email: Labels, Folders and Spam
-
Labels/Folders — most webmail lets a user create custom labels (e.g., 'College', 'Family') and apply them to emails for easy filtering, similar to folders in File Explorer.
-
Filters/Rules — automated instructions (e.g., 'always label emails from teacher@college.edu as College and skip the Inbox') that sort incoming mail without manual effort.
-
Signature — a block of text (name, designation, contact details) automatically appended to the end of every outgoing email, set once under Settings.
-
Spam/Junk filtering — automatically detects and separates unsolicited or fraudulent bulk email; periodically check this folder in case a genuine email is misfiled, but never click links inside suspected spam.
-
Unsubscribe — a link found in most legitimate promotional emails to stop receiving future mail from that particular sender.
4.16 Worked Walkthrough: Setting Up an Account and Sending an Email with Attachment
This walkthrough combines the skills of this chapter into one realistic end-to-end task.
-
Create a new Gmail account following the steps in Section 4.10, using your own name and a professional-sounding username.
-
Open your college's website in a new browser tab (Section 4.6) and use Ctrl+F to search the page for the Admissions Office email address.
-
Return to Gmail and click Compose.
-
In To, type the Admissions Office address you found; in CC, add your own email address so you retain a copy.
-
Type the Subject: 'Enquiry regarding VOI001 Course — [Your Roll Number]'.
-
In the body, write a short, polite enquiry (3-4 sentences) asking a genuine question about the course.
-
Prepare a one-page Word document (or use one created in Chapter 1) named with your Roll Number, then attach it using the paperclip icon.
-
Wait for the attachment to finish uploading, proofread the whole email, and click Send.
-
Open the Sent folder to confirm the email, with its attachment, was sent successfully.
यह अभ्यास खाता निर्माण, वेबसाइट पर खोज, ईमेल लेखन तथा अटैचमेंट भेजने के कौशल को एक व्यावहारिक कार्य में जोड़ता है।
✎ Exercise 4.16 (Practice / अभ्यास)
- Repeat the walkthrough above but this time attach TWO files (one Word document and one image) in the same email, and use BCC to send a hidden copy to a classmate.
4.17 Applications of the Internet and Email
-
Distance and online education, including submitting assignments and joining video lectures.
-
Formal professional communication, job applications, and official correspondence via email.
-
E-commerce, online bill payment, and banking.
-
Research, referencing digital libraries, journals, and encyclopaedic resources.
-
Staying informed through online news and government e-governance portals.
4.18 Limitations of the Internet and Email
-
Information overload and the spread of unverified or false content (Section 4.8).
-
Security and privacy risks if safe-use practices (Section 4.9) are not followed.
-
Dependence on a stable connection; poor connectivity in remote areas can restrict access.
-
Email lacks the tone and body language of face-to-face conversation, so messages can occasionally be misread.
-
Excessive time spent online can affect health, productivity, and in-person relationships if not managed with discipline.