Chapter 5: Introduction to MS Access
अध्याय 5: एमएस-एक्सेस का परिचय
5.1 Database Concepts: Data, Information and DBMS
Data refers to raw, unorganised facts (e.g., '19', 'Meerut', 'B.Sc.'); Information is data that has been organised and given context so it becomes meaningful (e.g., 'The student is 19 years old, lives in Meerut, and is enrolled in B.Sc.'). A Database is an organised collection of related data stored so it can be easily accessed, managed, and updated. A Database Management System (DBMS) is the software used to create and control such databases — MS Access is a popular Relational DBMS (RDBMS), meaning it organises data into related tables.
डेटा असंगठित तथ्य हैं, जबकि जानकारी (information) अर्थपूर्ण ढंग से संगठित डेटा है। डेटाबेस संबंधित डेटा का संगठित संग्रह है, और DBMS वह सॉफ्टवेयर है जो डेटाबेस बनाने व प्रबंधित करने हेतु उपयोग होता है। एमएस-एक्सेस एक रिलेशनल DBMS है।
Why use a database instead of a simple list in Word or Excel? A well-designed database:
-
Avoids repeating the same data in many places (reducing errors and wasted storage), by splitting information into separate, linked tables.
-
Enforces rules (e.g., 'Age must be a number', 'Roll Number cannot be blank') so invalid data is rejected at entry.
-
Allows fast, flexible retrieval of exactly the records needed through queries, rather than scrolling through an entire sheet manually.
-
Supports many simultaneous users safely accessing and updating shared data (in networked/enterprise settings).
5.2 Introduction to MS Access and Its Screen Layout
Microsoft Access is a desktop RDBMS included with certain Microsoft 365/Office editions, aimed at small-to-medium data-management tasks, letting users build databases without writing complex programming code.
-
Title Bar, Ribbon and Quick Access Toolbar — laid out the same way as in Word/Excel/PowerPoint, following the shared Office interface philosophy (Section 1.1.1).
-
Navigation Pane (left side) — lists every object in the currently open database (Tables, Queries, Forms, Reports), organised by type; double-clicking an object opens it.
-
Object Window (main area) — displays the currently open Table, Query, Form, or Report, which can usually be viewed in more than one View (e.g., Datasheet View or Design View).
-
Status Bar — shows the current View name and record navigation buttons (first, previous, next, last record) at the bottom.
नेविगेशन पेन में डेटाबेस की सभी वस्तुएँ (टेबल, क्वेरी, फॉर्म, रिपोर्ट) सूचीबद्ध होती हैं, जबकि मुख्य विंडो में चयनित वस्तु प्रदर्शित होती है।
5.3 Creating a Database and Understanding Access Objects
Step-by-step: creating a new blank database
-
Open MS Access and click Blank Database on the Start screen.
-
Type a File Name (e.g., StudentDB) in the box provided, and click the folder icon to choose a save location if needed.
-
Click Create; Access creates the new .accdb file and automatically opens one empty table named Table1 in Datasheet View, ready for data.
Every MS Access database is built from four main types of objects:
| Object | Purpose |
|---|---|
| Table | Stores the raw data itself, arranged in rows (records) and columns (fields) — the foundation of every database (Section 5.4). |
| Query | Asks a question of the data stored in one or more tables and returns only the matching records (Section 5.8). |
| Form | Provides a user-friendly on-screen layout for entering, viewing, and editing data one record at a time (Section 5.10). |
| Report | Presents data from tables/queries in a clean, printable, summarised layout, often with totals and grouping (Section 5.11). |
✎ Exercise 5.3 (Practice / अभ्यास)
- Create a new blank database named 'StudentDB', save it in a folder named with your Roll Number, then close and reopen it to confirm it saved correctly.
5.4 Creating a Table and Choosing Data Types
A Table is organised into Fields (columns, each holding one category of information, e.g., Name) and Records (rows, each holding one complete set of related data, e.g., one student's full details).
Step-by-step: creating a table in Design View (gives full control over data types)
-
Go to Create tab → Table Design.
-
In the Field Name column, type each field's name (e.g., StudentID, Name, DOB, Fees).
-
For each field, choose an appropriate Data Type from the drop-down in the adjoining column.
-
Save the table (Ctrl+S), typing a meaningful table name (e.g., Student) when prompted.
| Data Type | Used For |
|---|---|
| Short Text | Short alphanumeric entries up to 255 characters, e.g., Name, City. |
| Long Text | Lengthy text such as notes/comments/descriptions. |
| Number | Numeric values used in calculations, e.g., Age, Marks. |
| Date/Time | Calendar dates and/or clock times, e.g., Date of Birth, Admission Date. |
| Currency | Monetary values, automatically formatted with a currency symbol and two decimal places, e.g., Fees. |
| AutoNumber | A unique sequential number Access generates automatically for each new record — ideal for a Primary Key (Section 5.5). |
| Yes/No | A simple true/false or checkbox field, e.g., Scholarship (Yes/No). |
| Attachment/OLE Object | Stores an actual file, such as a scanned photo or document, inside the record. |
तालिका (टेबल) फ़ील्ड (कॉलम) एवं रिकॉर्ड (पंक्तियों) से बनी होती है। प्रत्येक फ़ील्ड हेतु उपयुक्त डेटा टाइप (जैसे Short Text, Number, Date/Time, Currency) चुनना आवश्यक है, ताकि केवल सही प्रकार का डेटा दर्ज हो सके।
✎ Exercise 5.4 (Practice / अभ्यास)
- In the StudentDB database, create a table named Student with fields: StudentID (AutoNumber), Name (Short Text), DOB (Date/Time), Class (Short Text), and Fees (Currency).
5.5 Primary Key and Foreign Key
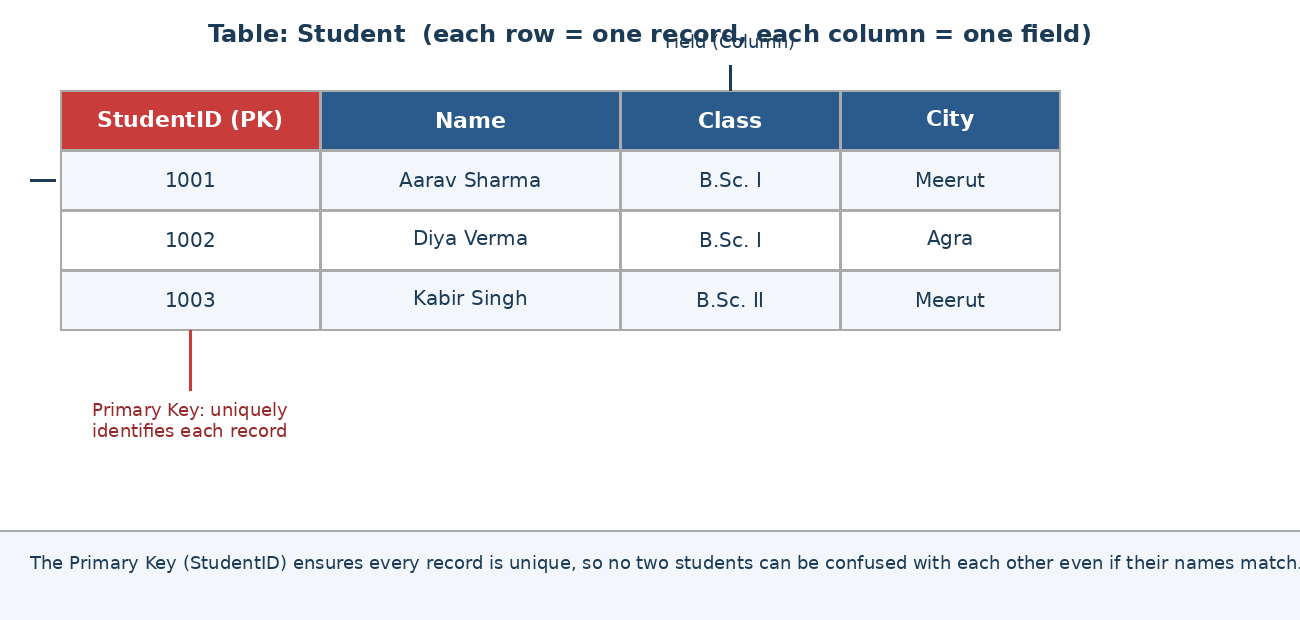
Fig 5.1 — A Primary Key (StudentID) uniquely identifies every record in a table
-
Primary Key — one field (or a small combination of fields) whose value is guaranteed to be unique for every record, so that record can always be identified without ambiguity; Access marks it with a small key icon in Design View.
-
Setting a Primary Key: in Design View, click the row selector of the chosen field, then click Primary Key on the Table Design tab (commonly applied to an AutoNumber ID field).
-
Foreign Key — a field in one table that refers to the Primary Key of another table, creating a link between the two (e.g., a StudentID field inside a Fees table, referring back to the Student table).
-
Composite Key — a Primary Key made up of two or more fields combined, used when no single field is unique on its own.
प्राइमरी की (Primary Key) वह फ़ील्ड है जो प्रत्येक रिकॉर्ड को विशिष्ट रूप से पहचानती है, जबकि फॉरेन की (Foreign Key) एक तालिका के फ़ील्ड को दूसरी तालिका की प्राइमरी की से जोड़ती है।
5.6 Entering and Editing Data: Datasheet View
Datasheet View displays a table's data as a familiar spreadsheet-like grid, ideal for direct typing and quick edits.
-
Adding a new record: click the row marked with an asterisk (*) at the bottom of the datasheet, and start typing; Access automatically creates a fresh blank row below it for the next record.
-
Navigating between fields: press Tab (or Enter) to move to the next field, Shift+Tab to move to the previous one.
-
Editing existing data: click directly into any cell and retype, exactly as in an Excel worksheet.
-
Deleting a record: click the grey row selector on the left of a record to select the whole row, then press Delete (Access will ask for confirmation, since deletion cannot be undone).
-
Adjusting column width: double-click the border between two column headers to AutoFit the width to the longest entry, just as in Excel.
✎ Exercise 5.6 (Practice / अभ्यास)
- Switch to Datasheet View of the Student table and enter at least 8 records with realistic data for each field.
5.7 Table Relationships
Splitting data across several linked tables (rather than one giant table) avoids repeating the same information and keeps the database organised — this is the core idea of a Relational Database.
-
One-to-Many — the most common relationship; e.g., one Student can have MANY entries in a Fees table, but each Fees record belongs to only one Student.
-
One-to-One — each record in one table corresponds to exactly one record in another; less common, used to split a very wide table for organisation or security.
-
Many-to-Many — records in either table can relate to many records in the other (e.g., Students and Subjects); implemented in practice using a third 'junction' table linking the two.
-
To define relationships: go to Database Tools tab → Relationships.
-
Add the tables to be linked using Show Table.
-
Drag the Primary Key field of one table onto the matching Foreign Key field of the related table to draw the relationship line.
-
In the dialog that appears, tick Enforce Referential Integrity so Access prevents orphaned records (e.g., a Fees entry referring to a Student that does not exist), then click Create.
तालिकाओं के बीच संबंध (relationships) स्थापित करने से डेटा की पुनरावृत्ति रुकती है और डेटाबेस संगठित रहता है — यही रिलेशनल डेटाबेस की मूल अवधारणा है।
5.8 Creating Basic Queries
A Query lets a user ask a specific question of the data and view only the matching records, optionally drawn from more than one related table at once, without altering the underlying tables.
Step-by-step: creating a Select Query using the Query Wizard
-
Go to Create tab → Query Wizard → Simple Query Wizard → OK.
-
Choose the source Table (or Query), then move the required fields from Available Fields to Selected Fields using the > button.
-
Click Next, give the query a meaningful name (e.g., StudentFeesQuery), and click Finish; the results open in Datasheet View.
Step-by-step: creating a Query with criteria in Design View (more control)
-
Go to Create tab → Query Design, add the required table(s), and double-click the fields to include.
-
In the Criteria row beneath a field, type a condition, e.g., typing >75 under Marks shows only students scoring above 75, or typing "Meerut" under City shows only students from Meerut.
-
Click Run (the red exclamation-mark icon) to execute the query and view matching records.
क्वेरी डेटा से विशिष्ट प्रश्न पूछने का माध्यम है — जैसे केवल उन्हीं रिकॉर्ड को दिखाना जो किसी शर्त (criteria) को पूरा करते हों, बिना मूल तालिका में कोई परिवर्तन किए।
✎ Exercise 5.8 (Practice / अभ्यास)
- Using the Query Wizard, create a query on the Student table showing only Name and Class. Then create a second query in Design View that shows only students whose Fees are above ₹10,000.
5.9 Sorting and Filtering Records
-
Sorting: click inside any field in Datasheet View, then click the A→Z (ascending) or Z→A (descending) icon on the Home tab to reorder all records by that field, similar to sorting in Excel (Section 2.5).
-
Filter by Selection: right-click a specific value inside a cell → Equals '\<value>' to instantly show only records matching that value.
-
Filter by Form: Home tab → Advanced → Filter By Form lets a user type several criteria across different fields at once before applying the filter together.
-
Toggle Filter: click Toggle Filter on the Home tab to switch quickly between the filtered view and the full, unfiltered list of records.
सॉर्टिंग (sorting) रिकॉर्ड को क्रम में व्यवस्थित करती है, जबकि फ़िल्टरिंग (filtering) केवल शर्त पूरी करने वाले रिकॉर्ड को दिखाती है — दोनों ही एक्सेल की समान सुविधाओं की तरह कार्य करती हैं।
5.10 Creating Forms
A Form presents fields from a table (or query) in a clean, one-record-at-a-time on-screen layout, making data entry easier and less error-prone than typing directly into a datasheet grid — especially for someone unfamiliar with the underlying table structure.
-
Select the table the form should be based on, in the Navigation Pane.
-
Go to Create tab → Form; Access instantly generates a usable form with all fields laid out automatically.
-
Switch to Layout View or Design View to rearrange fields, resize boxes, add a title, or apply a theme/colour scheme (Design tab → Themes).
-
Save the form with a meaningful name (e.g., StudentEntryForm).
-
Form Wizard (Create tab → Form Wizard) offers more control, letting a user choose exactly which fields to include and pick a layout (Columnar, Tabular, Datasheet) step by step.
-
Navigation buttons at the bottom of an open form let a user move between First, Previous, Next, Last, and a blank New record.
✎ Exercise 5.10 (Practice / अभ्यास)
- Create a Form for the Student table using the Form Wizard, choosing a Columnar layout. Use the form to add two more student records.
5.11 Creating Reports
A Report is used to present data attractively for printing or PDF export, typically with grouping, sorting, sub-totals, and a professional title/footer — unlike a Form, a Report is meant to be looked at rather than typed into.
-
Select the table or query the report should summarise, in the Navigation Pane.
-
Go to Create tab → Report Wizard for full control over field selection, grouping levels (e.g., group students by Class), and sort order.
-
On the Layout step, choose Stepped, Block, or Outline; on the last step, give the report a title (e.g., 'Class-wise Student List') and click Finish.
-
Switch to Print Preview to check pagination and page margins before printing (File → Print, or Ctrl+P).
-
Report totals: in Design View, a Text Box placed in the Report Footer with an expression such as =Sum([Fees]) automatically calculates and displays the grand total.
5.12 Proofing and Printing
-
Spelling Check (Review/Home tab → Spelling, F7): checks the text typed into Short Text/Long Text fields, similar to Word and Excel.
-
Print Preview: available for Tables, Queries, Forms, and Reports via File → Print → Print Preview, to check layout, margins, and page breaks before committing to paper.
-
Export options: File → Export lets a table/query/report be saved as a PDF, Excel Workbook, or Word/RTF document for sharing with people who do not have Access installed.
प्रिंट करने से पहले Print Preview में लेआउट व मार्जिन जाँचना उचित रहता है, तथा किसी भी वस्तु को PDF अथवा एक्सेल में एक्सपोर्ट किया जा सकता है।
5.13 Making Databases Attractive, Useful and Easy to Use
-
Use clear, consistent field names without spaces (e.g., StudentID rather than 'Student ID Number') to avoid errors in queries and expressions.
-
Always set an appropriate Primary Key so every record can be uniquely and reliably identified.
-
Split data into separate, properly related tables (Section 5.7) rather than one giant table, to avoid repeated and inconsistent data.
-
Use Forms for day-to-day data entry so users never need to touch the raw table directly.
-
Design Reports with clear headings, grouping, and totals so the printed output is genuinely useful to whoever reads it.
-
Regularly back up the .accdb file, since a single corrupted database file can mean losing all stored records.
5.14 Worked Walkthrough: Building a Complete Student Database
This walkthrough combines many MS Access skills into one realistic, end-to-end task — building a small database to manage student fee records.
-
Create a new blank database named FeeManagementDB.
-
Create a table named Student with fields StudentID (AutoNumber, set as Primary Key), Name (Short Text), Class (Short Text), and City (Short Text).
-
Create a second table named FeePayment with fields PaymentID (AutoNumber, Primary Key), StudentID (Number, to act as a Foreign Key), AmountPaid (Currency), and PaymentDate (Date/Time).
-
Go to Database Tools → Relationships, add both tables, and drag Student.StudentID onto FeePayment.StudentID, ticking Enforce Referential Integrity, to create a One-to-Many relationship.
-
Enter at least 6 student records into the Student table and at least 10 corresponding payment records into FeePayment.
-
Create a Query (Design View) showing Name, Class, and AmountPaid for students who paid more than ₹5,000 in a single payment.
-
Create a Form for the Student table using the Form Wizard, and use it to add one more record.
-
Create a Report (Report Wizard) grouping FeePayment records by StudentID, with a grand total of AmountPaid in the report footer.
-
Print Preview the report, then export it as a PDF.
यह अभ्यास तालिका, कुंजी, संबंध, क्वेरी, फॉर्म तथा रिपोर्ट के कौशल को एक व्यावहारिक फीस-प्रबंधन डेटाबेस में संयोजित करता है।
✎ Exercise 5.14 (Practice / अभ्यास)
- Build your own two-table database (with a One-to-Many relationship) on a topic of your choice — e.g., Library Books and Issued-To records, or Hostel Rooms and Residents — including at least one query, one form, and one report.
5.15 Applications of MS Access
-
Small-business record keeping: inventory, customer contacts, and simple invoicing.
-
Institutional record management: student admissions, library catalogues, and fee/attendance tracking.
-
Rapid prototyping of a data-driven application before committing to a larger, custom-built system.
-
Personal database projects, such as organising a personal book, music, or contact collection.
5.16 Limitations of MS Access
-
Designed for small-to-medium data volumes and a limited number of simultaneous users; large organisations typically need a dedicated server-based DBMS (e.g., SQL Server, MySQL, Oracle).
-
Available only as part of certain Microsoft 365/Office plans on Windows; it has no official version for macOS or mobile devices.
-
Poorly designed tables/relationships (Section 5.7) can lead to repeated, inconsistent data if normalisation principles are ignored.
-
Complex reporting or automation may require learning additional tools such as macros or VBA (Visual Basic for Applications).