Chapter 3: MS PowerPoint Lab
अध्याय 3: एमएस-पावरपॉइंट
3.1 Setting up the PowerPoint Environment
Microsoft PowerPoint is a presentation-graphics program used to design a Slide Show — a sequence of slides containing text, images, charts, audio, and video, projected or played back to communicate ideas to an audience.
माइक्रोसॉफ्ट पावरपॉइंट एक प्रेजेंटेशन-ग्राफिक्स प्रोग्राम है, जिससे स्लाइड शो — पाठ, चित्र, चार्ट, ऑडियो व वीडियो युक्त स्लाइडों का क्रम — तैयार किया जाता है, जो दर्शकों तक विचार पहुँचाने के लिए प्रस्तुत किया जाता है।
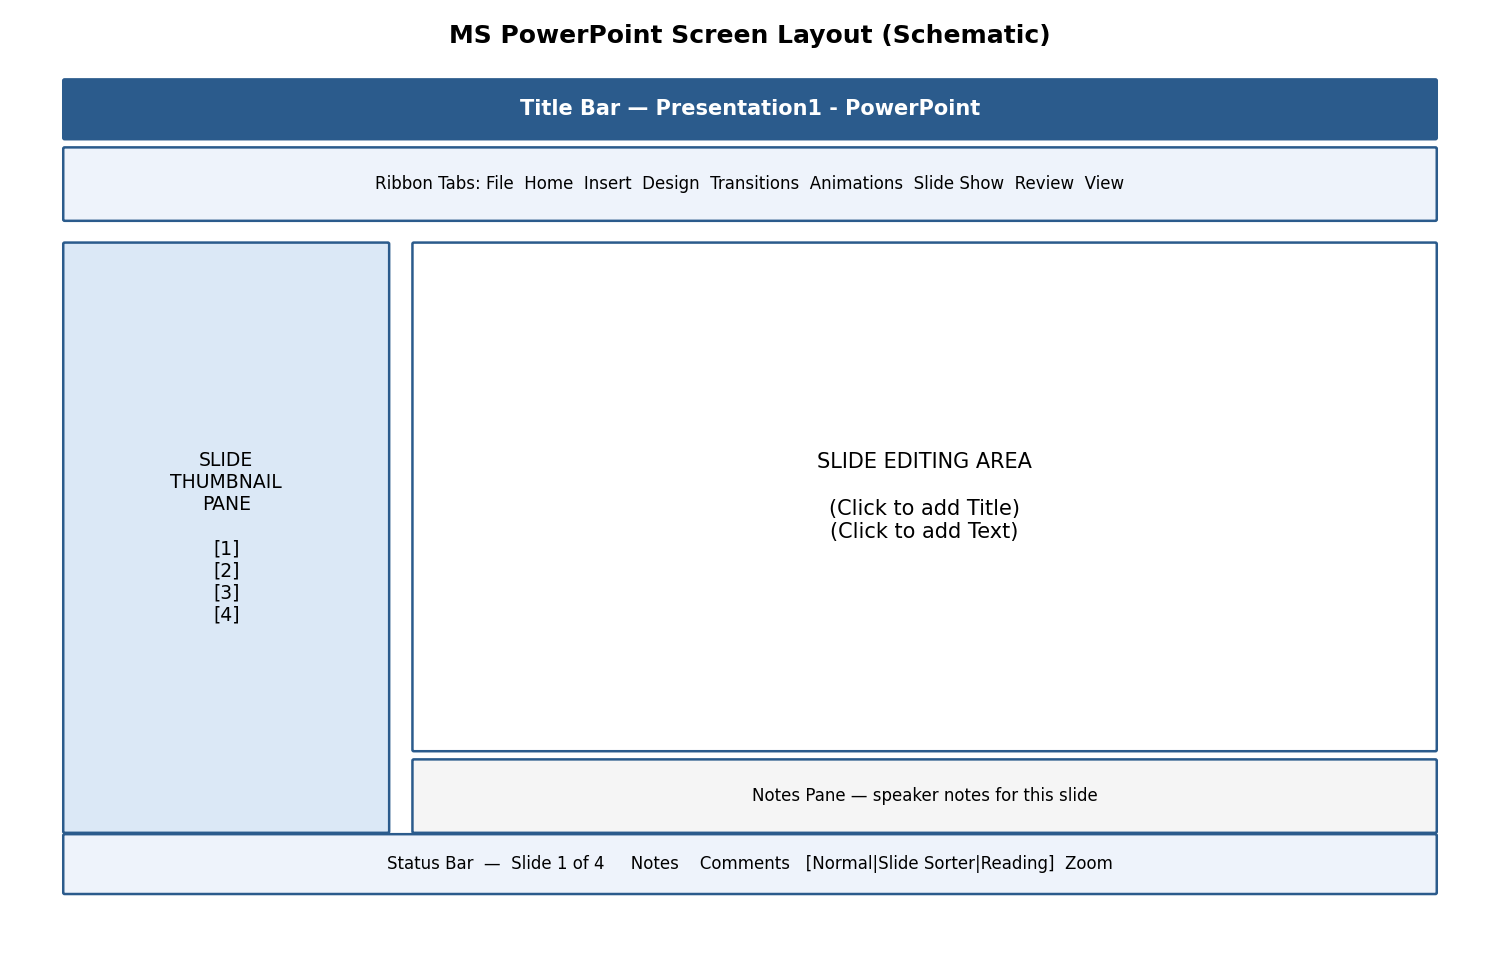
Fig 3.1 — Schematic layout of the PowerPoint screen
-
Slide Thumbnail Pane (left) — shows small previews of every slide in order; click a thumbnail to jump to that slide, drag to reorder.
-
Slide Editing Area (centre) — the large working area showing the current slide, with Placeholders (dashed boxes reading 'Click to add Title/Text') where content is typed or inserted.
-
Notes Pane (bottom) — a private area for speaker notes, visible to the presenter but not to the audience during a Slide Show.
-
Status Bar — shows slide number, applied theme/design, view buttons (Normal, Slide Sorter, Reading View, Slide Show), and Zoom control.
-
New/Open/Close/Save/Save As: identical concepts to Word and Excel; default format is PowerPoint Presentation (*.pptx).
-
Typing text: click inside a placeholder and type; text auto-fits or shrinks slightly if it overflows the placeholder box.
-
Alignment of text: Home tab → Paragraph group offers the same Left/Centre/Right/Justify options (Ctrl+L/E/R/J) as in Word.
3.2 Formatting Text
PowerPoint's text-formatting tools (Home tab → Font group) are essentially identical to Word's:
-
Font Size, Font Style, Font Colour — control the appearance of characters; slide text is usually kept LARGE (24-40 pt for body, 36-54 pt for titles) so it is readable from the back of a room.
-
Bold (Ctrl+B), Italic (Ctrl+I), Underline (Ctrl+U) for emphasis.
-
Cut (Ctrl+X), Copy (Ctrl+C), Paste (Ctrl+V), Paste Special (Ctrl+Alt+V — e.g., paste as a picture to 'freeze' formatting), Select All (Ctrl+A), Clear formatting.
-
Find (Ctrl+F) & Replace (Ctrl+H) to search/substitute text across all slides.
-
Working with Tabs & Indents: within a text placeholder, Tab demotes a bullet point to the next outline level; Shift+Tab promotes it — this is how sub-points are created.
3.3 Creating Slides and Applying Themes
-
Inserting a New Slide: Home tab → New Slide (or Ctrl+M) adds a slide after the current one; the small arrow under New Slide lets you pick a specific Layout (Title Slide, Title and Content, Two Content, Blank, etc.).
-
Changing the Layout of Slides: Home tab → Layout, to switch an existing slide's placeholder arrangement without losing its content.
-
Duplicating a Slide: right-click a slide thumbnail → Duplicate Slide (or Ctrl+D) — creates an exact copy, useful when several slides share a similar structure.
-
Copying and Pasting a Slide: right-click → Copy, then right-click the destination position → Paste (with options to Keep Source Formatting or Use Destination Theme).
-
Applying Themes (Design tab → Themes gallery): instantly changes the colour scheme, fonts, and background graphics of the ENTIRE presentation with one click.
-
Changing Theme Colour (Design tab → Variants → Colours): swaps just the colour palette while keeping the same theme layout.
-
Slide Background (Design tab → Format Background): sets a solid colour, gradient, texture/pattern, or picture as the background of the current slide or all slides.
-
Using Slide Views (View tab): Normal (editing), Slide Sorter (grid overview of all slides for easy reordering), Notes Page (full-page view of notes), Reading View, and Slide Show (full-screen playback).
नई स्लाइड जोड़ने, लेआउट बदलने, स्लाइड की नक़ल (duplicate) बनाने, तथा थीम (Theme) व बैकग्राउंड सेट करने से संपूर्ण प्रस्तुति का रंग-रूप एक ही क्लिक में सुसंगत रूप से बदला जा सकता है।
3.4 Working with Bullets and Numbering
-
Multilevel Numbering and Bulleting: within a text placeholder, use Tab/Shift+Tab to create sub-levels, each with its own bullet symbol/number style — Home tab → Bullets/Numbering drop-down to customise.
-
Creating a List: type each point and press Enter for the next bullet, exactly as in Word.
-
Page Bordering & Page Background: apply a border via a rectangle shape with no fill, or use Format Background for background colour/image on slides.
-
Aligning Text, Text Direction: Home tab → Paragraph group offers alignment and text-direction (horizontal, rotated, stacked) options identical to Word.
-
Column Options (Home tab → Add or Remove Columns): splits text within a placeholder into 2 or 3 columns, useful for comparison lists.
✎ Exercise 3.4 (Practice / अभ्यास)
- Create a 5-slide presentation titled 'Introduction to Computers' with a Title Slide, and 4 content slides using multilevel bulleted lists. Apply a Design theme and a consistent colour palette.
3.5 Working with Objects
-
Shapes, Clip Art & Pictures, WordArt, SmartArt — inserted via the Insert tab exactly as described for Word (Section 1.8); PowerPoint additionally auto-resizes objects to fit within the slide's visible area.
-
Change the Order of Objects: right-click → Bring Forward/Backward, Bring to Front/Send to Back — critical when several shapes/pictures/text boxes overlap on a slide.
-
Inserting Slide Header and Footer (Insert tab → Header & Footer): adds a fixed date, slide number, or short footer text (e.g., 'B.Sc. VOI001') that can appear on all slides or be excluded from the Title Slide.
-
Inserting Text Boxes, Shapes: for labels, captions, or callouts anywhere on the slide.
-
Using Quick Styles (Format tab, when a shape/picture is selected): one-click preset combinations of fill, outline, and effects.
-
Inserting WordArt, Symbols, Chart: identical Insert-tab tools to Word; a chart inserted in PowerPoint opens a small linked Excel worksheet for entering/editing the chart's data.
3.6 Hyperlinks and Action Buttons
-
Inserting a Hyperlink (Insert tab → Link, or Ctrl+K): select text or an object, then link it to another slide within the presentation, an external website URL, an email address, or another file — clicking the link during the slide show jumps to that destination.
-
Action Buttons (Insert tab → Shapes → Action Buttons category, e.g., Home, Next, Back, custom): pre-drawn button shapes that trigger an action (go to next/previous/first/last slide, run a program, play a sound) when clicked during the presentation.
-
Editing Hyperlinks and Action Buttons: right-click the linked object → Edit Hyperlink / Edit Action Settings to change or remove the destination.
-
WordArt & Shapes can themselves be turned into clickable hyperlinks or action buttons using the same Insert → Link dialog.
Example: A 'Contents' slide with 5 bulleted topics can have each bullet hyperlinked to its corresponding slide, and a small 'Home' action button placed on every subsequent slide to jump back to Contents — creating an interactive, non-linear presentation.
हाइपरलिंक व एक्शन बटन प्रस्तुति को इंटरैक्टिव (interactive) बनाते हैं — क्लिक करने पर सीधे किसी अन्य स्लाइड, वेबसाइट या फ़ाइल पर पहुँचा जा सकता है।
3.7 Working with Movies and Sound
-
Inserting a Movie/Video from a Computer File (Insert tab → Video → This Device): embeds a video clip directly onto the slide.
-
Inserting an Audio File (Insert tab → Audio → Audio on My PC): embeds background music, narration, or sound effects; the audio icon can be hidden or set to play automatically/across all slides.
-
Audio-Video Playback and Format Options (Playback tab, appears when a media object is selected): choose Start (On Click / Automatically), Volume, Loop until Stopped, and Hide While Not Playing.
-
Video Options: Play Full Screen, Rewind after Playing.
-
Adjust Options (Format tab): Corrections (brightness/contrast), Colour, and Poster Frame (the preview image shown before playback starts).
-
Reshaping & Bordering Video: apply Video Styles (preset frames/shapes) or a custom Video Shape/Border from the Format tab, just like formatting a picture.
3.8 Using SmartArt and Tables
-
Working with Tables (Insert tab → Table): identical concept to Word — rows/columns/cells for organised tabular data on a slide.
-
Table Formatting, Table Styles, Alignment Options, Merge & Split: same Table Design/Layout contextual tabs as Word.
-
Converting Text to SmartArt: select an existing bulleted text placeholder → Home tab → Convert to SmartArt → choose a diagram layout (e.g., process, cycle, hierarchy); PowerPoint automatically redistributes the text into the shapes.
✎ Exercise 3.8 (Practice / अभ्यास)
- On one slide, insert a 3×3 table comparing three social media platforms. On another slide, type a 4-point bulleted list of 'Steps to make tea' and convert it into a Process SmartArt diagram.
3.9 Animation and Slide Transition
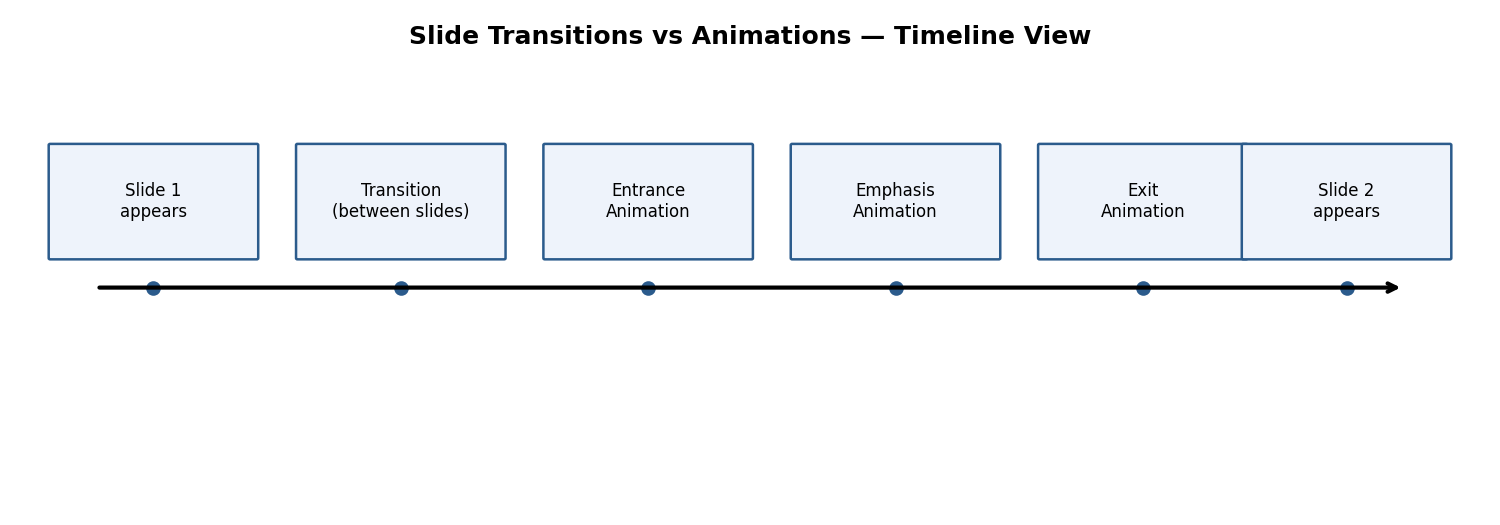
Fig 3.2 — Transitions occur between slides; animations occur within a slide
It is important to distinguish these two related but different features:
| Feature | Where it applies | Purpose |
|---|---|---|
| Transition | Between two slides | Controls how the NEXT slide replaces the current one (e.g., Fade, Push, Wipe) — set on the Transitions tab. |
| Animation | Within a single slide | Controls how an individual object (text, picture, shape) enters, is emphasised, or exits WHILE that slide is showing — set on the Animations tab. |
-
Default Animation: a basic entrance effect (e.g., Appear, Fade) applied to a placeholder via Animations tab → Animation gallery.
-
Custom Animation (Animation Pane, Animations tab → Animation Pane): lists every animation applied to the current slide's objects, in order, and lets you add multiple effects of the three types — Entrance (object appears), Emphasis (object already visible changes, e.g., spins or grows), and Exit (object leaves the slide).
-
Modifying a Default or Custom Animation: select an applied animation in the Animation Pane → Effect Options to change its direction/shape, or drag the small numbered tag to reorder it among other animations.
-
Reordering Animation Using the Animation Pane: drag entries up/down to change the sequence in which effects play.
-
Apply a Slide Transition (Transitions tab → gallery): click a transition style, then set its Duration and Sound (optional).
-
Modifying a Transition: Transitions tab → Effect Options changes the direction/variant of the chosen transition (e.g., 'Push' can come from Left, Right, Top, Bottom).
-
Advancing to the Next Slide (Transitions tab → Timing group): choose On Mouse Click (manual, presenter-controlled) and/or After a set number of seconds (automatic, for a self-running kiosk presentation).
Guidance: use animation and transitions sparingly and consistently — one transition style throughout, and only entrance animations on bullet points to reveal them one at a time — because excessive or mismatched effects distract the audience rather than aiding communication.
ट्रांज़िशन दो स्लाइडों के बीच होता है (एक स्लाइड से दूसरी में जाने का प्रभाव), जबकि एनिमेशन एक ही स्लाइड के भीतर किसी वस्तु के प्रवेश, प्रभाव अथवा निकास को नियंत्रित करता है। इनका संयमित उपयोग प्रस्तुति को प्रभावी बनाता है।
✎ Exercise 3.9 (Practice / अभ्यास)
- Apply a consistent slide transition (e.g., Fade, 1 second) to all slides of your 'Introduction to Computers' presentation. On the content slides, apply an Entrance animation ('Fly In' or 'Wipe') to each bullet point so they appear one at a time on mouse click.
3.10 Slide Show Options
-
Start Slide Show (Slide Show tab → From Beginning, or F5): plays the presentation full-screen starting at slide 1.
-
Start from Current Slide (Shift+F5): begins playback from whichever slide is currently open, useful while checking a specific slide.
-
Rehearse Timings (Slide Show tab → Rehearse Timings): lets the presenter practice while PowerPoint records how long each slide is shown, which can then be reused to auto-advance slides at the same pace during an unattended/kiosk playback.
-
Creating a Custom Slide Show (Slide Show tab → Custom Slide Show): defines a named sub-set and/or reordering of slides from the full deck — useful for showing a shorter version to a different audience without duplicating or deleting the original slides.
3.11 Proofing and Printing
-
Check Spelling as You Type: same red-wavy-line mechanism as Word; run a full check via Review tab → Spelling (F7).
-
Setting AutoCorrect Options: File → Options → Proofing → AutoCorrect Options, same dialog shared across Office apps.
-
Save as Video (File → Export → Create a Video): renders the entire presentation, including timings, narration, and animations, into a single video file (.mp4) that plays without PowerPoint installed.
-
Save as JPEG Files (File → Save As → choose JPEG File Interchange Format): saves either the current slide or every slide of the presentation as separate image files.
-
Save as PowerPoint Show File (Save As → PowerPoint Show *.ppsx): a file that opens DIRECTLY into full-screen Slide Show mode (skipping the editing view) when double-clicked — convenient for handing over a presentation to be run by someone else.
-
Print Preview and Print (File → Print): choose to print Full Page Slides, Notes Pages (slide + speaker notes), Outline (text only), or Handouts (multiple small slides per page, e.g., 3 or 6-per-page, ideal for giving the audience a paper reference with note-taking lines).
3.12 Making Presentations Attractive, Useful and Easy
-
Follow the 6×6 rule as a guideline: no more than roughly 6 bullet points per slide and 6 words per bullet, to avoid overcrowding a slide with text — key ideas, not full sentences, belong on a slide.
-
Maintain a consistent Theme, font, and colour scheme across every slide of the deck.
-
Prefer images, icons, and SmartArt diagrams over long paragraphs — visuals are processed and remembered faster than dense text.
-
Ensure sufficient colour contrast between text and background so content is legible even in a brightly lit room.
-
Use the Notes Pane for detailed speaking points rather than cramming them onto the visible slide.
-
Rehearse timing and use Presenter View (a second-monitor / projector-friendly view that shows the presenter their notes and the next slide while the audience only sees the current slide).
प्रस्तुति को प्रभावी बनाने हेतु प्रत्येक स्लाइड पर सीमित बिंदु, संगत थीम, अधि-चित्र/SmartArt व कम पाठ, तथा उचित रंग-विरोधाभास (contrast) का ध्यान रखें।
3.13 Worked Walkthrough: Building a Seminar Presentation
This walkthrough combines many PowerPoint skills into one realistic, end-to-end task — building a short seminar presentation on 'Renewable Energy'.
-
Create a New presentation and apply a clean, professional Design theme with good colour contrast.
-
Slide 1 (Title Slide): type the title 'Renewable Energy Sources' and your name/roll number as subtitle.
-
Slide 2 (Contents): list the topics to be covered as a bulleted list; later, hyperlink each bullet to its corresponding slide (Section 3.6).
-
Slide 3: type a short bulleted definition of renewable energy, then select the text and Convert to SmartArt using a simple list or process layout.
-
Slide 4: insert a Column Chart (linked mini-Excel sheet) comparing the approximate share of solar, wind, hydro, and other sources.
-
Slide 5: insert a relevant picture or diagram, and apply a Picture Style/border from the Format tab.
-
Slide 6 (Summary): a short bulleted recap of key points, plus a 'Thank You' closing line.
-
Add a small Home action button (Insert → Shapes → Action Buttons) on Slides 3-6 that links back to the Contents slide (Slide 2).
-
Apply ONE consistent Transition (e.g., Fade) to all slides via Transitions tab → Apply To All.
-
On Slide 3's bulleted SmartArt, apply an Entrance animation so points appear one at a time on mouse click, and check the sequence in the Animation Pane.
-
Add slide numbers and a footer with the course code via Insert → Header & Footer → Apply to All.
-
Rehearse Timings once to check pacing, then Save As a .pptx, and additionally Save As a .ppsx (PowerPoint Show) so it can be handed over to run directly in Slide Show mode.
As with the earlier Word and Excel walkthroughs, notice how design (theme, layout), content (SmartArt, chart, picture), interactivity (hyperlinks/action buttons), and motion (transitions/animations) are combined thoughtfully rather than applied excessively — this restraint is itself part of good presentation design (Section 3.12).
यह अभ्यास डिज़ाइन (थीम, लेआउट), सामग्री (SmartArt, चार्ट, चित्र), इंटरैक्टिविटी (हाइपरलिंक/एक्शन बटन) तथा गति (ट्रांज़िशन/एनिमेशन) को संतुलित रूप से जोड़ता है — यही संयम एक अच्छी प्रस्तुति के डिज़ाइन का भाग है।
✎ Exercise 3.13 (Practice / अभ्यास)
- Build your own 6-slide seminar presentation on a topic from your own subject specialisation, following the complete walkthrough above.
3.14 Applications of MS PowerPoint
-
Academic seminars, project/thesis defence presentations, guest lectures.
-
Corporate/business pitches, training modules, sales presentations.
-
Digital signage and self-running kiosk displays (using Rehearse Timings and Custom Slide Show).
-
Video creation for online learning (using Save as Video with narration and timings).
3.15 Limitations of MS PowerPoint
-
Encourages a tendency towards oversimplified, bullet-point-heavy communication that can strip away necessary nuance if not designed carefully ('death by PowerPoint').
-
Heavy use of embedded video/audio significantly increases file size, which can make sharing or emailing the file difficult.
-
Complex custom animations may not display identically across different PowerPoint versions or on other software (e.g., Google Slides, LibreOffice Impress) that opens the .pptx file.
-
A slide show is a supporting visual aid, not a substitute for a well-prepared, engaging spoken delivery by the presenter.